Discover next-gen bee processing innovations transforming beekeeping efficiency. Learn about Flow Hive, IoT monitoring, robotics, and eco-friendly tools shaping the future of honey harvesting.
Overview
The world of beekeeping is undergoing a rapid transformation, fueled by technological innovation and sustainable practices. Traditional honey harvesting and bee management methods are giving way to next-generation processing tools designed to save time, reduce stress on bees, and improve product quality. These innovations are not just about convenience—they’re shaping the future of beekeeping by merging efficiency with ecological responsibility.
Rethinking Wax: Not Just a Byproduct
More than just candle fuel, beeswax today is a:
- Biodegradable packaging solution
- Natural cosmetic base
- Component in 3D printing filament
- Ingredient in eco-construction and waterproofing
- Carbon-neutral fuel source (in pilot research)
With rising consumer demand for plastic-free, toxin-free, and sustainable products, beeswax is becoming a key player in the green economy.
Wax Composition, Reimagined
Did you know you can engineer wax for specific applications?
- Bleached wax (sunlight or peroxide-based) for luxury skincare
- Enhanced fragrance retention for premium candle blends
- Filtered micron wax for medical applications (lip balm, skin barrier creams)
Smart Wax Processing: Tools for Modern Apiaries
| Tool/Tech | Innovation |
|---|---|
| Solar-Powered Melters | Zero energy cost; now with rotating trays & light sensors |
| Multi-Chamber Eco Melters | Separate wax, honey, and slumgum in one automated cycle |
| WaxTrack App | Track batches, test purity, auto-labeling integration |
| Digital Wax Analyzers | Assess melting point, moisture, purity with precision |
| BioCycler Units | Reprocess slumgum into pellets for organic compost/fuel |
The Smart Wax Workflow (Upgraded Process)
1. Collect & Categorize
Digitally tag raw wax by source:
- Cappings Wax: Light, clean—ideal for personal care
- Brood Comb Wax: Darker, suited for industrial uses
- Burr/Brace Wax: Mixed-use for polish, crafts
Use QR-coded bins to track batches from hive to product.
2. Eco-Melt with Precision
Solar Smart Melters
- Self-regulating heat shields
- Thermo-insulated frames reduce wax degradation
- Built-in sediment traps for first-pass filtering
Induction Wax Melting
- Controlled electromagnetic heat, no direct flame
- Great for urban/indoor operations
Waterless Vacuum Melters
- Use low-pressure vaporization to separate impurities
- Retains wax aroma and reduces discoloration
3. Filter with Micro-Tech
Multi-layered filtration modules:
- Stainless mesh
- Bio-cellulose sheets (compostable)
- Charcoal pads (for odor correction)
- Nano-filter stages for pharmaceutical-grade wax
Add-on: UV sterilization pass to remove microbial contaminants.
4. Cast, Mold & Blend
Use smart mold systems that:
- Monitor cooling time
- Prevent cracking or warping
- Embed traceability (QR tags in wax blocks!)
Modular molds let you create:
- Pucks
- Bars
- Beads (for industrial use)
- Custom brand-stamped ingots
From Wax to Product: High-Margin Applications
Innovative wax processing unlocks countless opportunities:
| Product | Innovation Angle |
|---|---|
| Beeswax wraps | Infused with antimicrobial tree oils |
| Cosmetics | Blended with algae oil for skin synergy |
| 3D printing filament | Experimental blends with PLA or resin |
| Waterproofing paste | For leather, tents, outdoor gear |
| Solid perfume bases | Paired with essential oils |
| Biodegradable crayons/pencils | Eco-kids’ products with natural dyes |
Sustainable Wax Strategies
- Slumgum Repurposing: Compress into fire starters, biofuel bricks, or compost accelerators.
- Wax Waste Analytics: Measure your loss-to-yield ratio and optimize melting points.
- Packaging Innovations: Beeswax wraps, molded food lids, and lip balm tubes made of recycled wax.
- Zero-Waste Beeswax Studio: Design your workshop to reclaim and reuse everything—from cloths to rinse water.
Commercial Innovation: Build a Wax Brand
Create a beeswax brand identity with:
- Unique product colors (filtered white, amber, deep gold)
- Botanical infusion lines (lavender, citrus, eucalyptus)
- Luxury packaging (sustainable bamboo, paper tubes)
- QR-coded provenance: trace back to the hive
Bonus: Metrics That Matter
Track key innovation performance indicators:
| Metric | Why It Matters |
|---|---|
| Wax yield per hive (%) | Optimizes resource recovery |
| Energy use per kg wax | Helps reduce carbon footprint |
| Batch purity level (%) | Ensures high-quality end products |
| Slumgum recovery ratio | Converts waste into usable material |
Redefining the Role of Wax
Wax processing is no longer just about cleaning—it’s a gateway to creativity, sustainability, and small-scale manufacturing. By embracing innovation, today’s beekeepers are transforming beeswax into a versatile product platform that touches everything from beauty to bioengineering.
Whether you’re a backyard keeper or commercial apiarist, there’s never been a better time to think outside the hive and unlock the full power of processed wax.
Here’s our beginner’s guide to processing beeswax:
1: You will need:
- A large pot that you’re not attached to – buy one from a second-hand shop or use an old one
- A spoon or stirrer – this should also be something you no longer want
- A large plastic bucket
- Newspapers or painter’s cloths to cover your work surface
- Muslin cloth or an old t-shirt for straining wax
- Paper towels
- Mineral oil (optional for clean up)
2: Prepare your space
- Cover your benchtop and other work surfaces with newspapers, a painter’s drop cloth or other material – beeswax is very sticky and difficult to remove if it ends up on a surface.
- Cover the bucket with a large piece of muslin or even an old t-shirt.
- Secure with strong clips or a large rubber band.
3: Melt the wax
- Place the wax in the pot and cover it with water. Don’t overfill – if you have a large volume ofwax, you may need to do two or more loads.
- Put the pot on your stove and turn the heat to medium-low. Don’t be tempted to overheat – wax is very flammable.
- Bring the water to a simmer, but not a boil, and stir frequently.
- Watch and stir as the wax begins to melt – never leave unattended.
- The wax will float to the surface of the water, while the debris settles on the bottom.
4: Pour and strain
- Once the wax has melted, carefully lift the pot from the stove – you may need someone else to help you with this step if you are using a larger pot.
- Slowly pour the liquid through the fabric and into the bucket – the liquified wax and water will go through, while the debris will be caught in the fabric.
- If you have more wax to melt, go back to step one.
5: Cool and collect
- Once you have melted and strained all your wax cappings, remove the fabric cover and discard.
- Cover the bucket with a clean cloth and leave it to cool overnight.
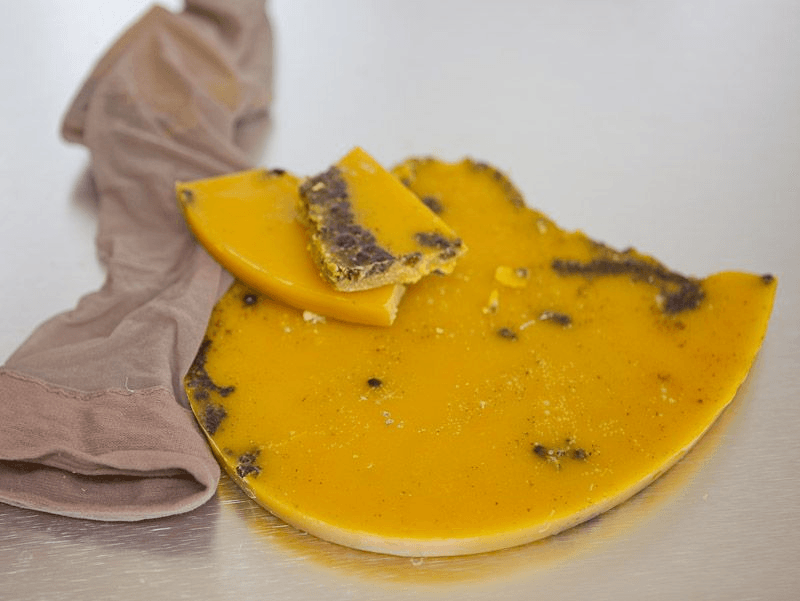
- When cool, the wax will form a firm yellow layer that floats on top of the water.
- Remove the wax disc from the bucket and pour the water out.
- Rinse the wax in cool water to remove any remaining honey residue, and carefully scrape any visible dirt from the base.
- In some cases, the wax may still be slightly dirty – if you’re not happy with yours, you can repeat the entire process from the beginning.
6: Store and use
- Wrap the wax in muslin or baking paper and store it in a cool place.
- When you’re ready to use it, re-melt it to make candles or other products.
- If you wish to sell wax or pass it on to friends, you can gently melt it in a double-boiler and pour small amounts into plastic moulds or containers. If you don’t have access to a double boiler, use an old pot to melt your wax and then use a stainless jug or pitcher to transfer the melted wax into your moulds.
7: Clean up
- Put drop cloths away for next time, or discard used newspapers.
- Wash your pot and utensils with hot water and put them away for your next wax processing – you won’t be able to get every bit of wax out, but you should be able to remove visible dirt.
- If surfaces are splattered with wax, use mineral oil and paper towels or a cloth .
What Is Next-Gen Wax Processing?
Next-generation wax processing refers to advanced techniques and equipment used in industries like investment casting, cosmetics, and packaging. These systems integrate automation, temperature control, and real-time monitoring to streamline workflows and enhance product quality.
Modern wax processing equipment often includes:
- Automated wax injection systems
- Precision-controlled melting tanks
- Vacuum-assisted dewaxing
- Eco-friendly recovery and recycling units
Benefits of Upgrading to Next-Gen Solutions
Investing in cutting-edge wax processing technology offers several competitive advantages:
- Improved consistency and accuracy: Advanced systems reduce human error, resulting in uniform molds and higher-quality end products.
- Reduced cycle times: Automation speeds up production, allowing for faster turnaround.
- Enhanced sustainability: Many systems now include wax recovery units to minimize environmental impact.
Applications Across Industries
From aerospace to fine jewelry, next-gen wax processing is reshaping how companies handle complex designs and tight tolerances.
- Investment casting: High-precision wax molds ensure better metal part integrity.
- Cosmetics: Sophisticated blending and cooling processes improve the texture and stability of wax-based products.
- Packaging and prototyping: Eco-conscious methods support sustainable innovation
Conclusion
Next-Gen Wax Processing is revolutionizing the way beekeepers manage one of the hive’s most valuable byproducts. With smart technology, eco-conscious design, and automated systems, the future of wax handling is efficient, scalable, and sustainable.
Whether you’re a hobbyist looking to improve wax reuse or a commercial apiarist scaling production, embracing these innovations can boost hive health, productivity, and profit.
FAQs About Next-Gen Wax Processing
- What is next-gen bee processing?
Next-gen bee processing refers to modern technologies and methods that make beekeeping more efficient, sustainable, and less invasive for bees. - How does the Flow Hive work?
The Flow Hive uses special frames that allow honey to be extracted directly without removing the comb or disturbing the bees. - Why is smart hive monitoring important?
Smart monitoring helps beekeepers track hive conditions like temperature, humidity, and weight in real time, enabling timely interventions. - Can AI really detect bee health problems?
Yes, AI can analyze sounds, images, and activity patterns to identify early signs of diseases, queen loss, or swarming. - What are thermosolar hives?
Thermosolar hives use solar heating to kill parasites like Varroa mites naturally without harming the bees. - How does blockchain help in beekeeping?
Blockchain ensures traceability of honey from hive to jar, providing proof of authenticity and preventing fraud. - What is precision beekeeping?
Precision beekeeping is a data-driven approach where decisions are based on sensor data, analytics, and real-time insights. - Are automated extractors worth the cost?
Automated extractors save time and labor, especially for commercial beekeepers, making them a worthwhile investment. - How do IoT devices benefit small-scale beekeepers?
IoT devices provide early alerts about hive health and conditions, helping small-scale beekeepers reduce losses and improve yields. - Do these technologies harm bees?
Most innovations are designed to be non-invasive, minimizing stress and reducing the need for traditional disruptive inspections. - Can smart hives work without internet access?
Some smart hive systems store data locally and sync when internet becomes available, making them usable in remote areas. - What role does machine learning play in beekeeping?
Machine learning improves prediction accuracy for colony health, pest detection, and productivity trends. - Are thermosolar hives eco-friendly?
Yes, they use renewable energy and reduce the need for chemical treatments. - What are automated feeders?
Automated feeders provide supplemental nutrition to bees when nectar is scarce, ensuring colony survival. - Is AI-based bee counting accurate?
Modern AI-powered counters at hive entrances can achieve accuracy rates above 90% in monitoring bee traffic and pollen intake. - Can technology reduce colony losses?
Yes, by providing real-time health alerts and environmental monitoring, losses can be significantly reduced. - Are these innovations affordable for beginners?
While some tools are costly, affordable versions and open-source designs are becoming available for small-scale beekeepers. - How does GPS help in beekeeping?
GPS helps track hives during migration and prevents theft by providing hive location data. - Is blockchain adoption common in honey production?
It’s still emerging but increasingly used for premium honey markets that demand traceability. - What is the future of next-gen beekeeping?
The future points toward fully integrated, AI-powered, and eco-friendly systems that maximize productivity while protecting bee populations.